April 18, 2025
Segmentation of Fine Facial Wrinkles with U-Net
Segmenting wrinkles is still unsolved task with many applications
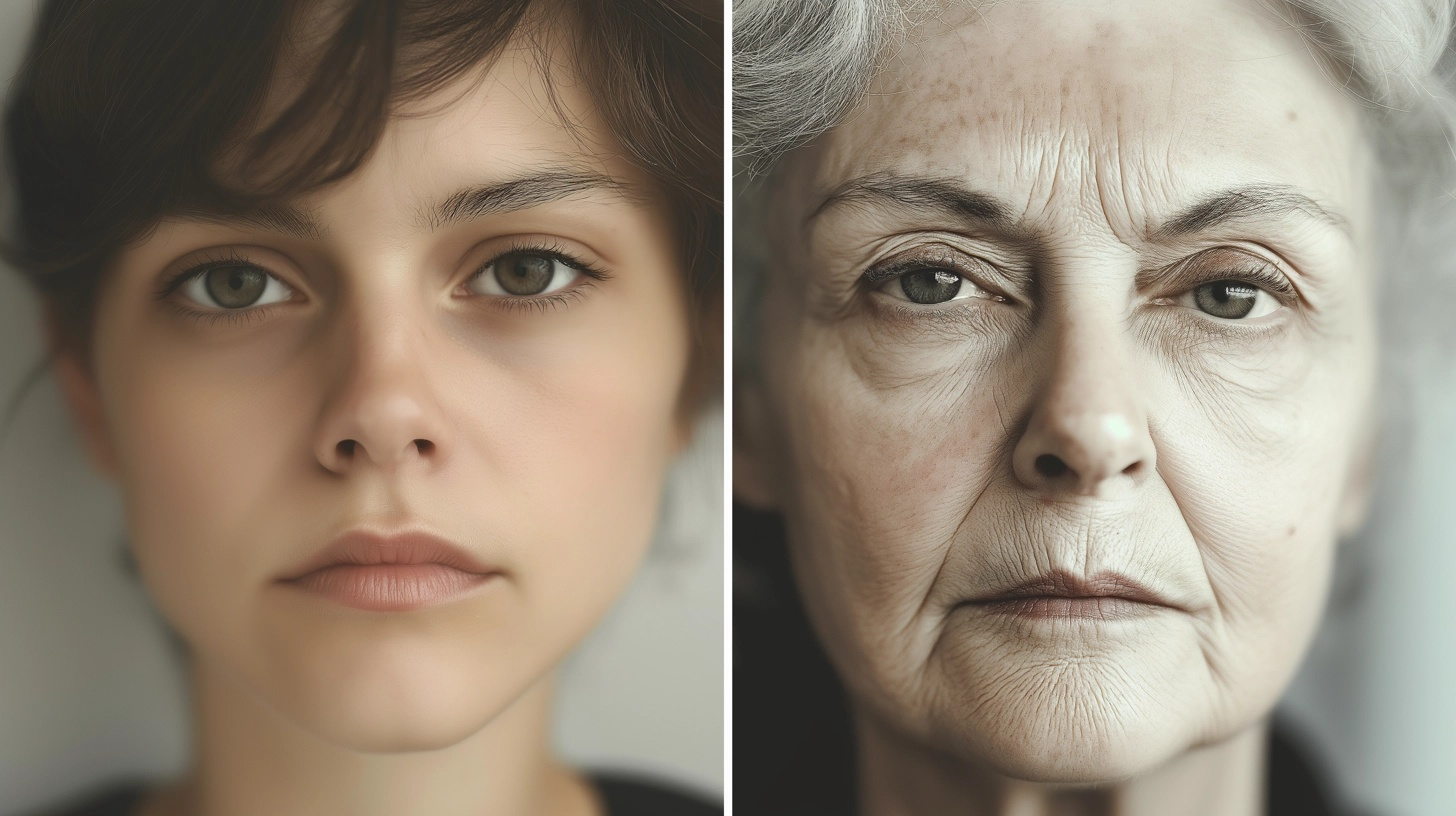
Table of Contents
- Introduction
- What are fine facial wrinkles and why are these so hard to classify?
- Model architecture
- Dataset Preparation and Augmentation
- Results and Evaluation
- Conclusion and Outlook
- Demo
Introduction
Facial wrinkle analysis is essential for a range of applications, from cosmetic product evaluation to dermatological interventions, invasive or non-invasive. In the past, traditional methods for detecting fine lines on a human face often rely on classical image processing—think edge detection or thresholding. While useful as a baseline, these methods tend to struggle with varying lighting conditions, complex skin textures, and subtle wrinkles, or telling the difference between facial hair and a wrinkle (damn edges!.) After some literature research, I was surprised to discover that the classic U-Net, a popular deep learning architecture initially designed for biomedical image segmentation (e.g., isolating cells, organs, and more) still renders the best results for facial wrinkle segmentation. In this blog post, I’ll discuss if U-Net for automatic wrinkle segmentation is good enough to get a decent IoU & Dice score, lessons learned, and next tips.
I documented my training and evaluation algorithm in a Github repository: FFHQ-detect-face-wrinkles. The demo is up on Google Colab.
Background
Wrinkles are a pain in the neck for both humans and deep learning models:
- Tiny structures: Fine wrinkles are just a few pixels wide. Detecting these thin lines requires high resolution and keen eyesight (or heavy magnification for the model).
- No clear definition: There’s no consensus on what counts as a wrinkle versus a fold versus a fine line. One person’s “character line” is another’s “wrinkle.” Even deep vs. superficial wrinkles have fuzzy boundaries.
- Annotation variability: Ask two dermatologists (or grad students) to hand-label wrinkles, and you’ll get different answers. Inherent subjectivity leads to inconsistent ground truth masks.
- Visual ambiguity: Wrinkles can be hard to see depending on lighting, facial expression, or image resolution. A harsh shadow might mimic a wrinkle. A light wrinkle might vanish under bright light. Think about why everyone started getting a ring light.
- Data Scarcity: Very few labeled wrinkle datasets exist. It’s not every day that people volunteer high-resolution photos of their wrinkles along with meticulous annotations.
- Class imbalance: On any face, the area covered by wrinkles is tiny compared to smooth skin. This leads to a highly imbalanced dataset (maybe 99% of pixels are “no-wrinkle”). The model can get lazy and just predict “no-wrinkle” everywhere and still achieve 99% accuracy – while completely failing at the actual task.
In short, wrinkles are the needle in the haystack of facial features. This sets the stage for why a specialized approach (and some clever tricks) are needed for segmentation.
Model architecture
unet/unet_model.py: Defines the U-Net model architecture.unet/unet_parts.py: Contains the building blocks of the U-Net model, such as convolutional layers, downsampling, and upsampling blocks.
Encoder
Following the steps in literature, the model I chose is a U-Net with a ResNet50 encoder (backbone) which was pretrained on ImageNet. This transfer learning approach could give the model a head start in recognizing low-level patterns (like edges and textures). There is the option to freeze or unfreeze a few layers or the entire ResNet50 encoder. When you freeze the entire encoder (i.e., no ResNet weights get updated), the network is effectively stuck with ImageNet features. But if your data is substantially different (like face wrinkles vs. typical ImageNet classes of cats and dogs), a frozen encoder never adapts to the new domain. This typically leads to poor segmentation performance—especially when your target masks are extremely imbalanced (like our very few wrinkle pixels.) So I opted to fine-tune the ResNet50 encoder, allowing it to gradually learn wrinkle-relevant features.
Decoder
The decoder follows the standard U-Net upsampling path, with skip connections from the encoder. Each skip connection from the encoder is filtered through an Attention Gate before merging. This essentially builds an Attention U-Net – the attention gates learn to emphasize only the relevant features from the encoder (e.g. those pixels that likely belong to wrinkles) and suppress noise (like backgrounds or unrelated textures). Recent research indicates attention can significantly improve segmentation of fine lines. For instance, Yang et al. (2024) introduced Striped WriNet, which uses a Striped Attention Module to focus on long, thin wrinkle patterns. Inspired by that, I integrated attention into my U-Net to help distinguish wrinkles from the surrounding skin by amplifying the telltale features of wrinkles. This is especially useful for such extremely small targets; attention acts like a spotlight on the wrinkles so they don’t get lost in the vast expanse of forehead.
Optionally one can use attention mechanisms to improve the results.Recent research indicates attention can significantly improve segmentation of fine lines. For instance, Yang et al. (2024) introduced Striped WriNet, which features a Striped Attention Module (SAM) to focus on long, thin wrinkle patterns. Adding attention to a U-Net could help the model distinguish wrinkles from skin texture by emphasizing relevant features. This is especially useful for extremely small targets like wrinkles, as attention can amplify their signal relative to the vast background.
The decoder uses transposed convolutions (learned upsampling) to get back to full 512×512 resolution.
Learning Rate and Optimizer: AdamW has the advantage of decoupling weight decay (regularization) from the learning rate schedule. The inclusion of weight decay is a positive regularization step, helping to prevent overfitting given the small fraction of positive pixels (wrinkles). I also employed a learning rate scheduler (ReduceLROnPlateau) that reduces lr when validation loss plateaus, and gradient clipping to avoid exploding gradients that can arise due to the focal loss on hard examples. A dropout rate with p=0.2 has also been introduced to further reduce overfitting. The idea was to stabilize the training in the case of imbalanced segmentation tasks.
Dataset Preparation and Augmentation
The project leverages the FFHQ-Wrinkle dataset used by Moon et al. (2024) Facial Wrinkle Segmentation for Cosmetic Dermatology: Pretraining with Texture Map-Based Weak Supervision) and Kim et al. (2024), A Facial Wrinkle Segmentation Method Based on Unet++ Model.
-
FFHQ-Wrinkle dataset (1000 masks) – Introduced by Moon et al. (2024), this dataset is an extension of NVIDIA’s FFHQ (Flickr-Faces-HQ) dataset. FFHQ-Wrinkle is an extension of the FFHQ (Flickr-Faces-HQ) dataset, specifically designed to include additional features related to facial wrinkles. It provides 1,000 high-res face images with manual wrinkle annotations (drawn by humans painstakingly marking every visible wrinkle) and a whopping 50,000 images with automatically generated weak labels. The weak labels are essentially wrinkles predicted by an algorithm (texture extractor) – not perfect, but a clever way to get lots of training data without manual effort. Moon et al.’s idea was to pretrain on those 50k weak labels and then fine-tune on the 1k real labels (something that I should probably do next.)
-
Kim et al.’s wrinkle dataset (820 masks) – The authors of the UNet++ paper provided their own dataset of manually annotated fine wrinkles across the entire face. I found their data via their project GitHub. I primarily used the manual annotations from this set too and removed the masks that overlapped with the FFHQ wrinkle dataset.
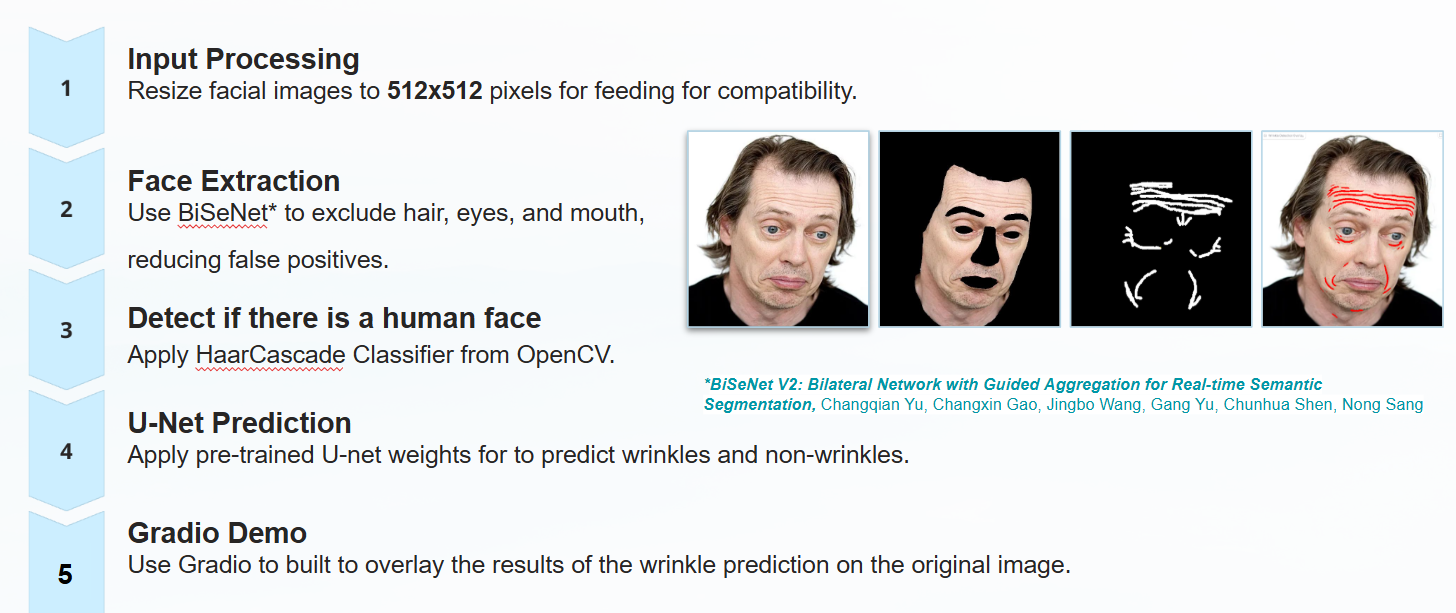
I modified the face_masking.py to a new version of face_parsing_extraction.py usign BiSeNET to crop faces given an input folder and provided face-parsed labels for the face images corresponding to the manual wrinkle labels as 512x512 numpy arrays, which were obtained using face-parsing.PyTorch. This way the user can create new manual labels and generate new face-parsed images.
The pre-trained face weights can be downloaded from here . The pre-trained wrinkle weights can be downloaded from here. Both ".pth" weight files should be saved in "res/cp/".

Data transformation:
Since my combined dataset is modest in size, augmentation was crucial to teach the model invariances and to see wrinkles in various conditions. I applied a suite of augmentations randomly during training, including:
-
Normalization: All augmented images were normalized to the standard ImageNet mean/std, since we’re using a ResNet backbone that expects roughly normalized input.
-
Flips and rotations: Horizontal flip (because a wrinkle on the left eye vs right eye should be treated the same) and slight rotations (±15°) to simulate different camera angles or head tilts.
-
Scale and translation: Small scaling (zoom in/out by 10%) and shifts (up to 10% of image) via affine transforms, to make the model robust to distance and centering variations.
-
Lighting and blur: I used CLAHE (Contrast Limited Adaptive Histogram Equalization) to randomly adjust contrast in local patches (sometimes wrinkles pop more under certain lighting). I added Gaussian blur or noise occasionally because a slight blur can simulate a lower-quality photo where wrinkles are softer, while noise can simulate sensor noise or skin texture variance.
-
Elastic deformation: (Just made things worse at first try) I tried a slight elastic distortion to mimic the stretching of skin or different facial expressions. However my results were worse, i.e. IoU decreased when I applied elastic transforms.
One potentially useful augmentation trick: mask dilation.
Because wrinkles are so thin, one idea was to slightly dilate (thicken) the ground truth wrinkle masks during some training iterations. The thought was to make the model’s job a tiny bit easier (the target line a bit thicker), so it learns to at least hit the vicinity of the wrinkle. This is an optional step and I kept it modest (a 3×3 kernel once). It’s like giving the model a wider paintbrush to aim with initially. In later evaluation, I always measure the thin original masks. This trick of “fattening” the target can sometimes help with extremely thin structures (in theory). I can’t say it was a game-changer here for my final IoU and Dice values, but it’s a handy trick to keep in the toolbox.
Here is the workflow for the face pre-processing:
Results and evaluation
Dealing with class imbalance
The extreme class imbalance (skin pixels vastly outnumber wrinkle pixels) was the biggest challenge in training. Given the extreme class imbalance, underfitting (lack of signal) is more a concern than overfitting, so regularization beyond data augmentation was applied judiciously.
Focal + Dice loss evaluation Kim et al. (2024), Automated Facial Wrinkle Segmentation Scheme Using UNet++ also trained with Dice + Focal to tackle the tiny proportion of wrinkle pixels. In their study, this combination outperformed alternatives (like binary cross-entropy + focal) in terms of IoU and F1. Dice loss is ideal for segmentation imbalance since it directly maximizes overlap (treating the tiny positive region with equal importance), while focal loss down-weights easy negatives and focuses learning on the hard positives (wrinkle pixels).
However, one has to pay attention to choosing the optimal parameters for these losses. Focal loss can blow up if nearly all pixels are negative (or if your model saturates its outputs to 0 or 1 early on). Even with your small alpha=0.75, if the model sees almost no positive pixels in a batch, the log(1 - p) or log(p) can get extreme, producing Infs / NaNs in half‐precision.
In practice, the Combined loss = Dice + Focal pushed the model to pay attention to wrinkles without totally neglecting the overall structure. During training, I monitored these losses separately. Typically, Dice loss would start high (since overlap was initially poor) and improve, while focal loss would ensure the model didn’t just predict all zeros.
Evaluation Metrics
Hyperparameters
All the hyperparameters can be set in config.yaml file to set the desired training parameters. Weights&Biases is used for tracking.
evaluate.pyandlosses.py: Evaluates the trained model on the validation dataset. It computes various metrics such as Dice score, precision, recall, F1 score, and AUC. It also logs and saves images for visualization. For Dice score, a combined loss of average Dice Loss + average Focal Loss has been used due to the high class-imbalace. This loss function balances class imbalance and model confidence by penalizing incorrect predictions more aggressively. Itersection-over-Union (IoU or Jaccard Index) is the primary metric of interest to improve upon. IoU directly measures how well the predicted wrinkle mask overlaps with ground truth, which is crucial when the positive region is very small.
The evaluation code computes not only IoU but also precision, recall, F1, and AUC. Monitoring F1-score (which for segmentation is the same as Dice coefficient) is useful since it’s insensitive to true negatives (dominant here) and gives a sense of balance between precision and recall. In Kim et al.’s experiments, Dice+Focal training yielded an F1 of 0.6157 and IoU ~0.45, whereas Moon et al. report higher F1 (around 0.64) and Jaccard (~0.48) after their advanced pretrainig. By examining precision-recall curve alongside IoU, we can understand if improvements should focus on reducing false positives or recovering more missed wrinkles. A balanced F1 and high IoU are the end-goals.
- IoU (Intersection-over-Union), also known as Jaccard Index – this is my primary metric of interest. It directly measures overlap between the predicted wrinkle mask and the ground truth mask. Given how small the wrinkle region is, IoU is a tough but meaningful metric; if IoU is, say, 0.5, it means the model is correctly identifying a lot of the wrinkle pixels (50% overlap is pretty good when the region is that tiny).
- Dice coefficient – essentially the same as F1 score for the positive class. Dice is very similar to IoU but gives slightly more weight to true positives. In segmentation tasks with extreme class imbalance, Dice/F1 is often more informative than plain accuracy. I tracked Dice to see the balance between precision and recall.
-
Precision and Recall – to diagnose whether the model is leaning towards false positives or false negatives. For example, a high precision but low recall means the model is finding a few wrinkles very accurately but missing many others (under-segmenting), whereas the opposite means it’s marking lots of things as wrinkles (over-segmenting, including false alarms).
-
AUC (Area Under the ROC curve) – treating it as a pixel-wise binary classification, AUC tells how well the model ranks pixels as wrinkle vs not-wrinkle across different thresholds. It’s a nice overall measure of separability. I included AUC because with such imbalanced data, sometimes a model might have a decent AUC even if at the default threshold (0.5) the IoU is low – meaning, with some threshold tuning you could get better results. It also complements the picture: IoU/F1 focuses on one threshold, AUC looks at all.
| Parameter | Value |
|---|---|
| Batch size | 8 |
| Epochs | 100 |
| Learning rate | 0.0001 |
| Optimizer | AdamW |
| Weight decay | 0.00001 |
| Scheduler | ReduceLROnPlateau (patience=15) |
| Gradient clipping | 1 |
| Pretrained backbone | ResNet50 (ImageNet) Encoder with Unet decoder |
| Encoder frozen | false, unfreeze only last 2 layers for fine-tuning |
| Augmentation | true |
| Dropout | 0.2 |
| Face region cropping | BiSeNet-based skin masking |
| Input image size | 512 × 512 |
| Loss function | Dice + Focal |
| Dataset used | Manually labeled FFHQ-Wrinkle + Kim dataset |
| AMP / Mixed precision | Disabled |
Results
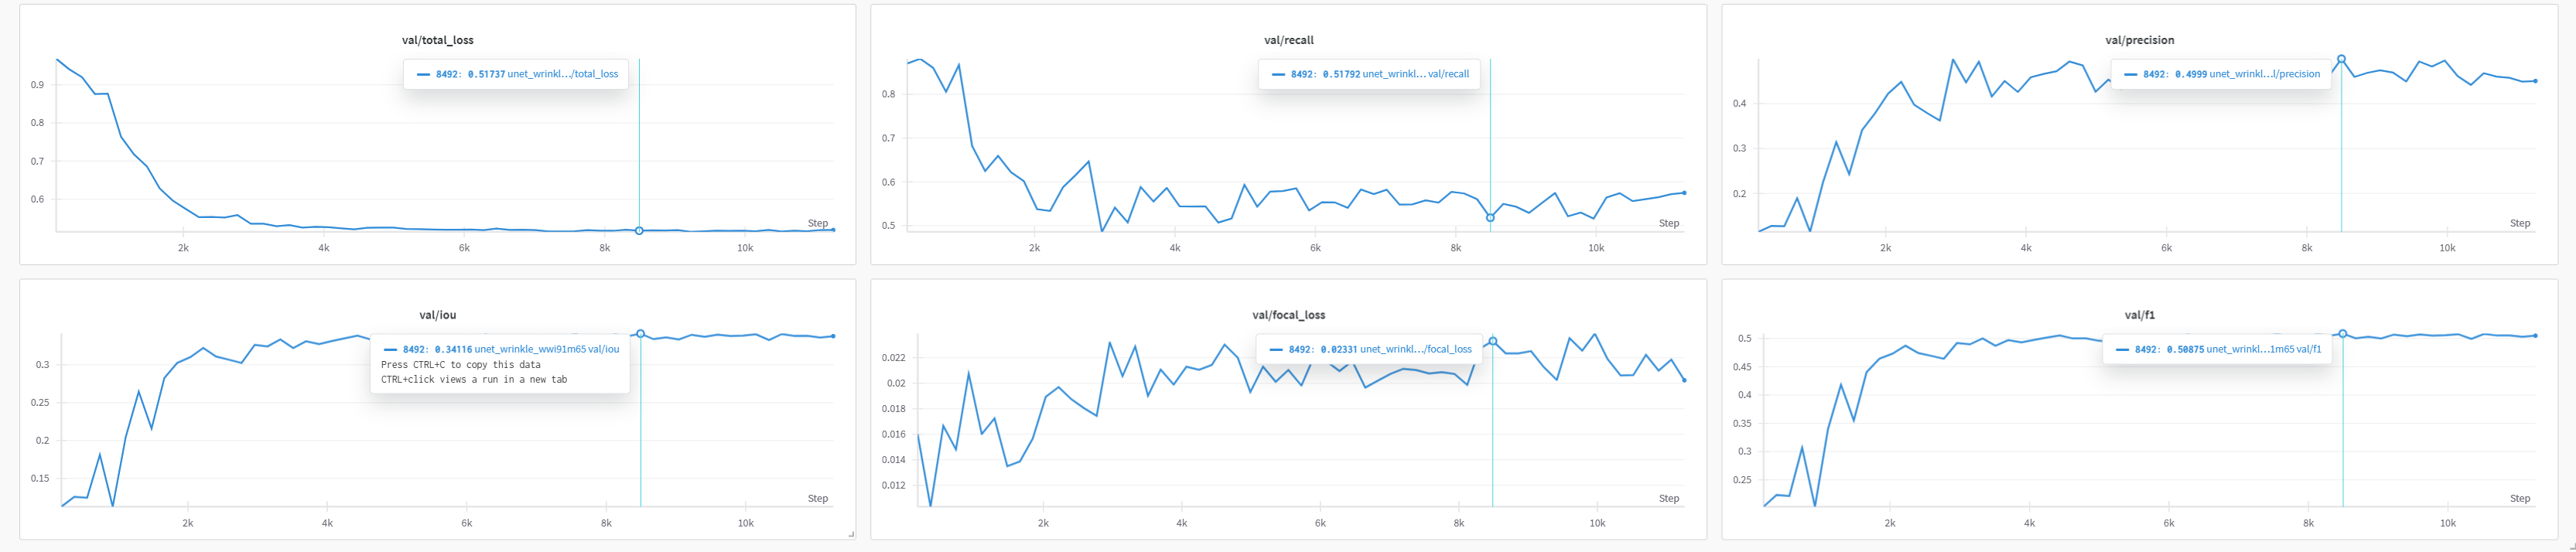
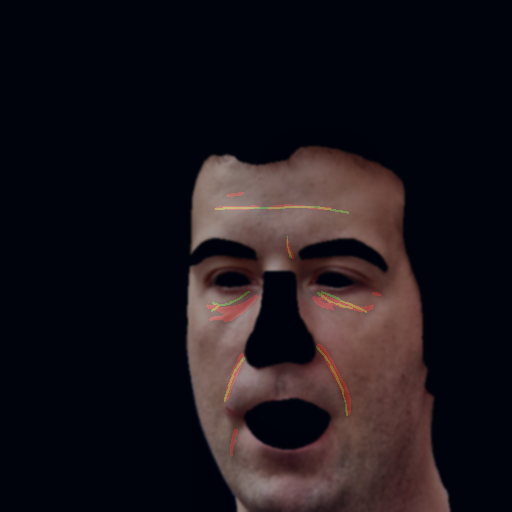
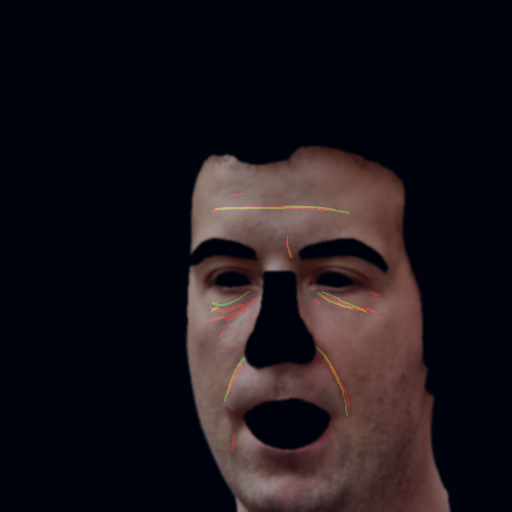
In practice, my model’s IoU on the validation set ended up in the mid 0.3s (around 0.34), and the Dice/F1 around 0.60. This is in the same ballpark as the numbers reported by Kim et al. (2024) for their UNet++ (they achieved IoU ≈ 0.45 and F1 ≈ 0.616). Considering I did not use the 50k extra images or the fancy multi-channel input that Moon et al. used, I’m quite happy that a straightforward U-Net model can get that close to state-of-the-art. It validates that the architectural choices (ResNet50 backbone, attention, loss functions) were on point. To get a better sense of model behavior, I also looked at the precision-recall curve. It showed that if I tuned the probability threshold a bit lower than 0.5, I could catch more wrinkles (improve recall) without tanking precision too much – which would boost the F1 a bit more. This is a common scenario in medical-like segmentation: you might prefer to err on the side of marking a wrinkle that isn’t there (false positive) rather than missing a real wrinkle (false negative), depending on the application. By examining precision and recall, I could decide how to balance the model if, say, a dermatologist user said “I want to see all possible wrinkles, even if a few turns out to be skin lines.” The AUC seems inflated possibly showing that I am over-fitting, but that’s typical for highly imbalanced segmentation task.
Performance comparison with other literature work
| Metric | My Model (U-Net) | Kim et al. (2024, UNet++) | Moon et al. (2024, 2-Stage) |
|---|---|---|---|
| Best Val Epoch | 45 | around 500 | 150 (finetune), 300 (pretrain) |
| Val IoU (Jaccard) | 0.3412 | ~0.45 | ~0.48 |
| Val F1 (Dice) | 0.5087 | ~0.6157 | ~0.64 |
| Val Precision | 0.4999 | 0.6435 | Not reported |
| Val Recall | 0.5179 | Not reported | Not reported |
| Loss Function | Dice + Focal | Dice + Focal | Soft Dice (finetune), MSE (pretrain) |
| Data Used | ~2K manually labeled faces | ~1K manually labeled images | 50K weak + 1K manual |
| Architecture | U-Net + ResNet50 | UNet++ & ResNeXt-50 | U-Net / Swin UNETR + Texture map input |
Outlook & Conclusion
Class balancing and patching: Next I will consider approaches like oversampling wrinkle regions or training in patches focusing on areas likely to have wrinkles (like around eyes, forehead, mouth.). One idea is to sample patches of the image during training that contain at least one wrinkle, to avoid too many all-background patches. A patch-based refinement (zooming into high-importance areas) is something else that I marked as a potential future improvement.
Weakly supervised texture maps: Moon et al. (2024) approached the imbalance from a different angle – they leveraged 50k weakly-labeled images to pretrain their model. In their two-stage strategy, the first stage teaches the model “what a wrinkle could look like” by predicting texture maps on a large dataset, and the second stage fine-tunes on the smaller true dataset. By doing so, they achieved an F1-score around 0.64 and Jaccard Index (IoU) ~0.48, which is currently one of the best reported results for this task. I didn’t use the weak data for training in this project (to keep things simpler and purely supervised), but that’s my next stepy: more data (even if noisy) can help if used carefully.
Finally, it’s worth noting that evaluating wrinkle segmentation is inherently a bit subjective – if my model predicts a wrinkle that the ground truth mask missed, is it truly a false positive or did the annotator just not mark that faint line? I’ve seen cases in the outputs where I honestly think the model found a real wrinkle that the label didn’t have. In a practical application, one might even intentionally bias the model to over-predict slightly, then have a human review the suggested wrinkles. That could be a semi-automated approach to eventually build an even bigger high-quality labeled dataset.
Wrinkle segmentation is hard. It taught me to pay attention (literally, via attention mechanisms) to the little things, to never underestimate the impact of a good loss function, and to always be ready to improvise when the data is limited. If you made it this far, thanks for reading – now excuse me while I go apply some moisturizer and retinol; all this talk of wrinkles has reminded me to take better care of my skin!
Demo
What’s a project without a cool demo? There is an interactive demo where you can upload a face photo (or use one from FFHQ) and see the model highlight the wrinkles. It’s both fascinating and a bit frightening. I used Gradio and the code can be run from app.py. Alternatively, I quickly pulled together this Colab Notebook (that might not work because I continuously tweak it).
